Here are the directions for making the cage extensions. It isn't difficult, all you need are a few tools and the right materials -- all should be available at your local hardware store. Note that this cage was designed to fit my own living room, so you will probably want to modify the design to fit your specifications.
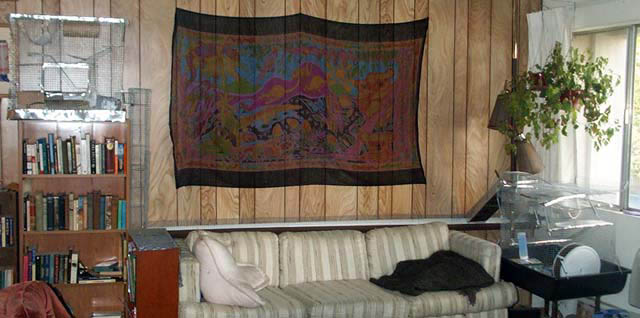
General layout of the Rat Annex
|
|
|
|

Tools
- 1 pair sturdy wire cutters to cut hardware cloth
- 1 pair snub-nosed wire cutters to trim sharp edges
- 1 pair pliers to bend wire
- 1 pair needle nosed pliers to bend sharp wire ends (optional)
- 1 pair kitchen scissors to cut aluminum siding
- 1 pair Have-a-Heart cage clamp pliers
- 1 bag Have-a-Heart cage clamps
- 1 hacksaw to cut the gutter if necessary
10-foot gutter runway
Materials
- 1/2 inch x 1/2 inch hardware cloth
- 1 ten-foot plastic gutter with plastic ridges running along the inside edges.
- 2 plastic gutter ends
Directions
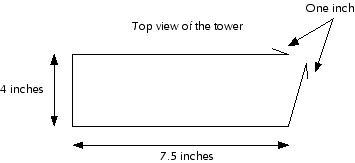
General idea: this design gives you a covered run for your rats. The gutter is roofed by an arch of hardware cloth running its entire length. My rats love it -- they gallop up and down its length, and sleep regularly at either end.
1) Clean and disinfect the gutter.
2) Measure the place you want to put the gutter, and cut a piece off the end of the gutter to make it fit. My space was about 5 inches too narrow.
3) For the roof: Cut long rectangles of hardware cloth that are exactly 7 inches wide. It doesn't matter how long they are -- my pieces are between two and three feet long -- as long as the total length of all your pieces is the same as the length of the gutter. Trim all the sharp points using snub nosed pliers.
|
|

4) Take each piece of hardware cloth and bend it gently along its length. Don't make a sharp corner, just a gentle arc.
|
|
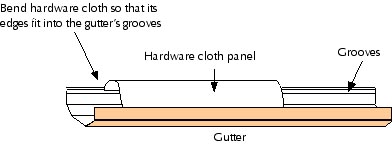
5) This is the tough part (it takes some strength). The idea here is to bend the hardware cloth so that the both long edges fit into the grooves running along the inside of the gutter. The hardware cloth *wants* to be straight and flat, it will resist being curved like this, so the edges will press really hard against the gutter. This mechanical pressure will keep the roof in place -- you don't need any other fasteners. It is stiff enough that the rats can't push it out. This also means that the gutter is really easy to get in to -- you just hook your fingers through the wire, give it a sharp tug, and the panel comes off.
|
|
6) Place the other panels. You can slide them along the gutter to make everything fit.
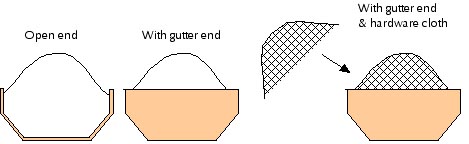
7) To stop up the ends: Place the plastic gutter ends on either end of the gutter. Cut a half-circle of hardware cloth to fit the open "window" between the top of the gutter end and the hardware cloth. Wire it in place.
|
|
8) I had a 5 inch piece of gutter left over, so I flipped it over and placed it over one end to make a solid roof that fits fairly snugly over the wire. The rats love this little "hidey hole" and sleep there a lot.
9) Ideas for attaching the gutter to other parts of the cage. As it is, the gutter is free-standing, a closed system. My gutter has two openings. The easiest one is at one end. I just cut the last three inches of hardware cloth off one roof-panel to make a hole, then slid the end of the climbing tower into the hole so that it fit snugly. For the other opening, I shortened a middle panel by 4 inches, making a 4 inch gap in the hardware cloth. I fit a ramp with its own arching roof into the hole and fixed it there with a spring. The intersection of the two roofs was quite exciting -- it gave me a whole new respect for Roman architects. Contact me if you want specific details :)
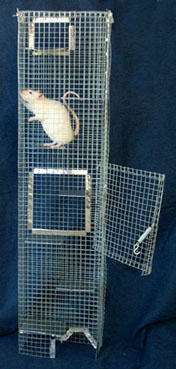
Climbing Tower
Materials
- 1/2 inch x 1/2 inch hardware cloth
- 1 roll aluminum flashing
- 1 spring
- 1 S-hook
- wire
Directions
General idea: I found that my rats didn't really like climbing straight up or down vertical sheets of wire. They *can* do it, but they look really nervous as they go down head first. I'd be nervous too. My rats definitely prefer ramps or steps.
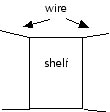
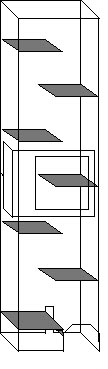
I needed to get my rats to go straight up three vertical feet (from the back of the couch to the top of a bookcase), and I didn't want to build a ramp which would have blocked the picture above my couch. So I decided on stairs -- or rather, a vertical series of alternating small shelves, set into a long rectangular "box" of hardware cloth: like this:
|
|
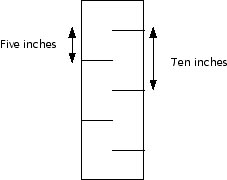
I found with some experimenting and measuring that my adult female rats like these shelves to be five inches above each other. Adult males may need the shelves to be farther apart, and may in fact prefer a column that is bigger in all dimensions.
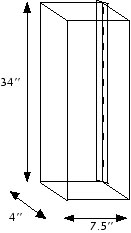
1) Building the outside box. My outside box is 7.5 inches wide x 4 inches deep x 34 inches tall. The "seam" runs up one of the back edges.
2) Cut a rectangle of hardware 27 x 34 inches. This piece will have two extra inches -- you can fold these backwards (like a hem) to give the tower more structural integrity. Remove all the sharp wire ends with snub nosed pliers.
3) Make the first 90 degree bend at 8.5 inches (remember the extra inch) to make the back wall of the tower. Make the second after 4 more inches, the third after 7.5 more inches. Fold the extra inch back along the outside of the tower for strength.
|
|
4) Close the last corner along the fold with Have-A-Heart cage clips. You'll end up with a rectangular box that looks like this:
|
|
5) Now, for the shelves. The general idea is to cut a bunch of little shelves out of aluminum flashing, and fasten them inside the cage with wire.
Note: when I design shelves, I like them to have a 1/2 inch space between their edges and the cage wall. This keeps feet and tails from getting caught. This also means that the shelves have to be suspended somehow -- I use wire.
Finished dimensions of shelf: 3 x 4 inches. I always add 1/2 inch to the final dimensions of the shelf so I can fold the edges under for structural stability. To suspend the shelves, I sandwich wire between the top of the shelf and its fold.
6) Cut a 4 x 5 piece of aluminum flashing. Remove a 1/2 x 1/2 inch square from each corner:
|
|
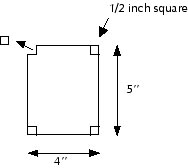
Fold the two long flaps completely under:
|
|
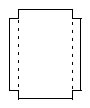
7) Cut two seven inch lengths of wire. These pieces of wire will fit under the short flaps of the shelf, and will attach the shelf to the cage. Fold the two short flaps completely under, trapping a piece of wire under each flap. Pinch the flaps down tight with pliers. You'll end up with something like this:
|
|
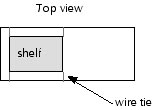
8) Now you can attach the shelf to the inside of the tower. Push the shelf inside, decide on a height, and twist the four wires around the hardware cloth at the same height, making sure to adjust the shelf so that you leave a 1/2 inch space between the shelf and the wall. The shelf will be suspended by the wires.
|
|
9) Now repeat for all your shelves, placing them on alternating sides of the tower as you go up. Separate them by a vertical distance of five inches.
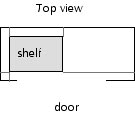
10) I wanted a door in the middle of my column, so the shelf directly behind the door could not have the same attachment points. I ran three wires through the shelf, on both long edges and one short edge, and attached it as follows:
|
|
11) To make the roof, cut a 9 x 6 rectangular piece of hardware cloth, cut out a half inch square from each corner, fold the four edges down to 90 degrees, and attach with wire ties or Have-a-Heart cage clips.
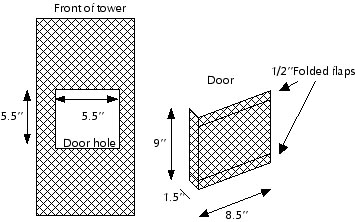
12) To make the door hole, cut a 5.5 x 5.5 inch rectangular hole in the front of the tower, in front of the special shelf (see below). Trim the sharp wire edges with snub nosed pliers. To make the doorframe even safer, cut long, thin strips of aluminum flashing (5.5 x 1 inch), fold them down the middle lengthwise, and clamp them around the doorframe with pliers.
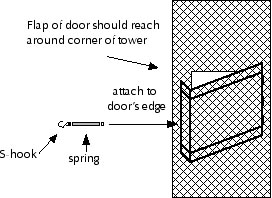
13) For the door itself, cut a 10 x 10 inch piece of hardware cloth. Fold 1/2 inch completely over on two opposite sides -- the folded sides will be the top and bottom of your door. Fold a 1.5 inch flap to 90 degrees on a third side -- this will be the free side of your door. This lip will reach around the edge of the tower. The only unfolded edge left will be the hinge -- attach with Have-a-Heart cage clips
|
|
14) Attach the unfolded edge of the door to the tower with Have-A-Heart cage clips. Make sure the 90 degree folded edge can reach easily around the corner of the tower (see below).
15) For the door fastener, attach the S-hook to one of the spring's ends with pliers. Attach the other end of the spring to the middle of the free edge of the door. To close the door, hook the S-hook onto the tower wall.
|
|
16) To attach the tower to other things, you can cut holes in its walls. I have a hole at the top that connects to a secondary cage. At the bottom, my tower rests on the gutter described above. I cut an arch out of the bottom of the tower that corresponds to the gutter and its roof. In the back of the tower, I cut a slit that goes over the gutter wall. This makes a snug connection with the gutter. To close the rest of the bottom of the tower, I attached a rectangle of hardware cloth with cage clips for security, then covered it with aluminum flashing to protect the rats' feet. This makes a very sturdy shelf. The lip of the shelf spills into the gutter to make that a secure edge. The tower is not otherwise attached to the gutter -- when I need to it simply lifts off.
|
|
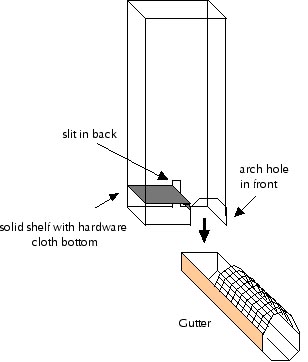
This attachment point may be unique to my setup, so I won't give specific instructions here.
Completed tower:
|
|
|
Digging Box
Tools
- 1 pair sturdy wire cutters to cut hardware cloth
- 1 pair snub-nosed wire cutters to trim sharp edges
- 1 hacksaw (optional -- you may be able to get the wood cut to size at the store)
- 1 screwdriver
- 1 hammer
Materials
- about 10 inches x 20 inches of 1/2 inch x 1/2 inch hardware cloth
- 1 ten gallon aquarium
- 1 bag potting soil (I used 1 16 quart bag Black Gold, all organic potting soil, containing earthworm castings, Canadian sphagnum peat moss, pumice, and oyster shell)
- 2 1-inch hinges + screws (sold as package)
- 8 small corner brackets + screws (sold as package)
- 4 9.75 inch lengths of 1"x1" wood*
- 4 7.50 inch lengths of 1"x1" wood*
- wood staples
- 2 small springs
- 2 S-hooks
- several feet of wire
- 4 small screw-in hooks or eyelets
*Note: Measure the top of your aquarium to get the exact dimensions needed for the wood frame. My aquarium is 9.75 inches x 19.75 inches and I cut my wood accordingly.
Directions
General idea: this design gives you an aquarium 2/3 full of dirt for rats to dig in. It also includes a hinged, home-made top made out of wood and hardware cloth. The top is of course optional: if you have a secure, wire mesh top already or know where to buy one, you can use that. I chose to make one because I didn't want to cut holes in the nice top I already had. My rats love their digging box -- they dive in head first, kick dirt with their hind feet, shove dirt with their front feet, scoot dirt sideways, hunt for hidden seeds and get royally dirty!
1) Clean and disinfect the aquarium.
2) Fill the aquarium 2/3 full with potting soil (I used the whole bag).
Roof
1) Take 2 of the 9.75 inch lengths of wood, and 2 of the 7.5 inch lengths, and fasten them together with 4 corner brackets to make a square frame. Make the 9.75 inch lengths parallel to each other, and the 7.5 lengths parallel to each other and sitting 'inside' the two longer lengths. You should end up with 2 squares that are 9.75 x 9.5 on a side. The 9.5 sides will abut the narrow end of the aquarium, the 9.75 sides will abut the long side of the aquarium.
2) Cut the hardware cloth into two 9.5 x 9.75 rectangles and trim all the sharp wire ends with blunt-nosed clippers. Staple to the two square frames using the wood staples and hammer. The hardware cloth side will be the bottom of the roof and will face into the aquarium.
3) Flip the two squares over so that the staples face the floor. Line up two of the shorter sides so that they almost touch. Attach the two frames with the two hinges on these shorter sides. Leave a small gap (e.g. 0.25 inch) between the wood frames.
Fastening the roof to the aquarium
The roof needs to fit very securely to the aquarium or the rats will push it up and escape. You can accomplish this by weighting the roof down with bricks or books, or use a catch or spring system. Here's what I came up with. I screwed hooks into the wood frame and ran a wire from one hook to the other, under the aquarium. To keep the wire under tension, I fastened it with a spring. The top is very secure and can't be lifted by the rats. It is kind of a hack, though, and not that attractive. Here are the directions.
1) Place roof hinge-side up on top of the aquarium.
2) Decide which panel you want to be the door, and which one you want to stay put.
3) On the stay-put side, drive two screw-hooks into the middle of the 9.75 inch lengths, such that the hooks come out the outside sides of the frame (and not the top).
4) Attach an S-hook to a spring with pliers, and hook the S-hook through one of these screw hooks.
5) Run a length of wire from the end of the spring, under the aquarium, to the other screw-hook on the other side. Pull it tight (make the spring stretch, or unhook the spring for this step) and fasten with a twist to the other screw-hook.
6) On the door side, fasten a screw-hook into the middle of the 7.5 inch length, and another to the far 7.5 inch length on the stay-put side. (The stay-put side ends up with 3 screw-hooks, the door side with just one).
7) Repeat steps #4 and #5 between these two hooks.
If you want to attach the digging box to a cage, you can cut a hole in the stay-put side of the roof and run a climbing tower through the hole Note that your rats may not like jumping from the roof level down onto the dirt, which may be up to 1 foot away (my rats hate to jump more than 6 inches). To overcome this I hung a ledge under the hole in the roof (aluminum flashing panel hung by 4 corners and stabilized with a vertical strip of hardware cloth so it doesn't swing). The rats jump from the climbing tower to the intermediate ledge, and from there to the dirt. Alternatively, you can run the climbing tower down into the aquarium so the drop isn't so big.